Optics Reborn V2
An edge glow effect with inner/outer color gradients. Creates beautiful animated glows around matte edges with novel sampling for smooth, organic results.
Overview
Optics Reborn generates glows that radiate from matte edges with:
- Dual Color System - Separate inner and outer colors for gradient glows
- Animated Noise - Procedural noise modulation for organic, living glows
- Light Wrap - Edge blur for natural foreground/background integration
- Foreground/Background Dimming - Control brightness inside and outside the matte.
Quick Start
Easiest: Use the Presets!
 Select the effect from the ofx list, and drag it onto a corrector node (color page) or onto a clip (editor page).
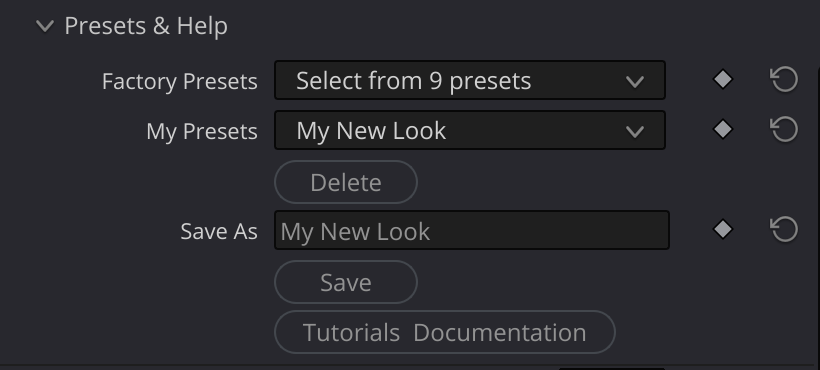
In the presets group, there are two dropdowns: "Factory Presets" and "My Presets". Try out the various factory presets to get the idea of the range of effects you can get with the Optics Reborn OFX.
You might have to adjust the Advanced Noise-> Noise Scale, depending on how large the element you are adding noise to is.
Later, when you develop your own looks, you can save your own presets; Give your look a name in the "save as" field, and click "save". Then, your own presets will be available in the "My Presets" drop down.
Manual Effect Quick Start:
- Apply the effect to your clip
- Connect a Matte to the "Matte" input (white = foreground)
- Adjust Radius to control glow spread
- Set Inner and Outer Colors for your desired gradient
- Increase Overall Density for a stronger effect
Inputs
| Input | Required | Description |
|---|---|---|
| Source | Yes | The foreground/background image |
| Matte | Yes | Use the second input's rgb tab to input a Grayscale matte defining the edge (white = inside, black = outside) |
Parameters
Main
Core glow controls.
| Parameter | Type | Default | Range | Description |
|---|---|---|---|---|
| Radius | float | 4.0 | 0.0 - 100.0 | How far the glow radiates from the matte edge |
| Overall Density | float | 1.0 | 0.0 - 10.0 | Overall brightness multiplier for the entire glow |
Inner Color
Controls the color closest to the matte edge.
| Parameter | Type | Default | Description |
|---|---|---|---|
| Inner Color | color | green (0.616, 1.0, 0.431) | The color at the matte edge |
| Inner Density | float | 1.0 | Intensity of the inner color (0.0 - 10.0) |
Outer Color
Controls the color at the outer edge of the glow.
| Parameter | Type | Default | Description |
|---|---|---|---|
| Outer Color | color | red (1.0, 0.133, 0.133) | The color away from the matte edge |
| Outer Density | float | 1.7 | Intensity of the outer color (0.0 - 10.0) |
| Falloff | float | 0.5 | Controls inner/outer color transition (higher = more inner color) |
Falloff
The Falloff parameter controls how the inner and outer colors blend. Low values favor the outer color, high favors the inner color.
Filtering
Separate blur controls for softening the matte and light-wrap effects independantly.
Glow Blur
Pre-blurs the matte to create a softer glow foundation:
Edge Blur
Creates a light-wrap effect at the boundary between foreground and glow.
Simple Noise
Basic noise jitter. A more "frenetic" looking effect.
| Parameter | Type | Default | Range | Description |
|---|---|---|---|---|
| Simple Noise | float | 0.0 | 0.0 - 100.0 | High frequency noise jitter on sample positions |
Simple Noise adds random variation/flicker to the glow pattern, breaking up uniformity. However, it is uniform across the glow. (unlike advanced noise, which usually looks more interesting.)
Advanced Noise
Animated procedural noise for advanced glow edges.
| Parameter | Default | Range | Description |
|---|---|---|---|
| Advanced Noise | True | - | Enable animated procedural noise modulation |
| Noise Speed | 1.0 | -100 to 100 | Animation speed |
| Noise Time Offset | 0.0 | -1000 to 1000 | Manual animation offset. Usually unnecessary - Use to vary the same effect, when applied to successive shots. |
| Noise Scale | 10.0 | 0.1 - 100.0 | Size of noise pattern. This changes scales the "noise space" so it behaves in the opposite way to what you might expect - Small values make larger noise patterns. |
| Noise Position | 0.5, 0.5 | - | Position offset for noise pattern |
Noise Remapping
Fine-tune how noise values affect the glow intensity. This is similar to using the "Histogram" in Photoshop, but it acts on the animated noise. The Noise In Low and Noise In High clip the lowest and highest noise values. The Noise Out Low and Noise Out High remap those clipped values.
| Parameter | Type | Default | Range | Description |
|---|---|---|---|---|
| Noise In Low | float | 0.0 | -1.0 to 1.0 | Input low point (values below map to Out Low) |
| Noise In High | float | 1.0 | 0.0 to 2.0 | Input high point (values above map to Out High) |
| Noise Out Low | float | 0.2 | -1.0 to 10.0 | Output minimum (glow multiplier) |
| Noise Out High | float | 2.0 | -1.0 to 10.0 | Output maximum (glow multiplier) |
If the IN values are close to each other, you get more "crinkly" or contrasty noise; If they are farther apart, you get smoother noise. The Out low controls how bright the dimmest parts are, and the Out High controls how bright the brightest parts are.
At the end of the day, it's best to just play with these until you like it, and don't overthink it.
FG/BG Dimming
Control brightness inside and outside the matte.
When you have a bright scene, glows might not read very well. Use these controls to darken the background separately from the subject, so the glow can... you know, glow.
| Parameter | Default | Range | Description |
|---|---|---|---|
| Foreground Dim | 1.0 | 0.0 - 2.0 | Brightness multiplier for matte area |
| Background Dim | 1.0 | 0.0 - 2.0 | Brightness multiplier for non-matte area |
Output
You might want to composite the glows in your own ways, in fusion. This selector lets you have access to various parts of the output.
| Parameter | Default | Options | Description |
|---|---|---|---|
| Output | Result | Result, No FG Punchout, Glow Only, Glow with Punchout | Output mode selection |
Output Modes
- Result - Complete composite with foreground, background, and glow (the normal mode of operation)
- No FG Punchout - Glow extends over the foreground (no matte cutout)
- Glow Only - Just the glow layer (for compositing elsewhere)
- Glow with Punchout - Glow layer with foreground matte applied
Sampling
The defaults will probably be fine, but if you see sampling artifacts, or have performance issues, you can adjust the sample rates here.
| Parameter | Default | Description |
|---|---|---|
| Min Samples | 128 | The smallest number of samples used on small radii |
| Max Samples | 500 | The largest number of samples used on large radii |
| Sample Multiplier | 1 | an overall quality multiplier - Increasing this will give you more samples - but before you increase this parameter, try adding some glow blur first. |
| Reference Radius | 30 | The radius that will get the maximum number of samples. Radii above this will be capped at the max number of samples as well. |
Tips & Tricks
Try with Text
Use Resolve's Text tool to generate text, and use that as your matte. Then, in the Output group, try "Glow with Punchout" to get a dramatic effect.
Glow appears grainy
- Increase Glow Blur to soften
- Reduce Simple Noise
- Increase Sample Multiplier (as little as possible)
Colors not blending smoothly
- Adjust Falloff to control gradient
- Try similar Inner/Outer colors
- Increase Glow Blur
Performance issues
- Reduce Max Samples for preview
- Decrease filtering-> Glow Blur
- Lower Radius if possible
Noise too chaotic
- In Advanced Noise:
- Reduce Noise Speed
- Widen the Noise In Low/High range
- Narrow the Noise Out Low/High range
- Adjust Noise Scale for smoother patterns