Advanced Lens Blur
High end photographic lens simulation, built by professionals to enhance the emotional weight to your imagery.
Designed to be used in Resolve's color page, so you can quickly enhance your shots as you develop your looks, but works equally well in the timeline, and fusion.
Overview
Advanced Lens Blur recreates the characteristics of real camera lenses:
- Swirly Bokeh - Petzval-style rotating background blur
- Cat's Eye Effect - Mechanical vignetting that creates elliptical bokeh at frame edges
- Aperture Blades - Polygonal bokeh shapes (pentagon, hexagon, etc.)
- Falloff Controls - Radial, Depth Gradient (linear), and Custom blur distribution, for making interesting focus effects like Tilt-Shift, and rack focus.
- Cinematic Misalignment - Simulates misaligned lens elements, for more exotic lens effects. (GPU intensive!)
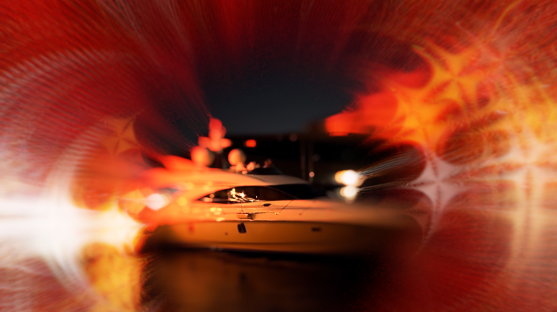
- Bokeh Occlusion - Animated foreground silhouettes (Seen in long lens shots, with grass or branches near the lens. This shows up as moving shapes dancing through the bokeh circles)
- HDR simulation by "popping" the highlights of the bokeh shapes.
Quick Start
The best way to get started is to use the presets to get familiar with the range of effects, then delve into the individual settings.
Easiest: Use the Presets!
Select the effect from the ofx list, and drag it onto a corrector node (color page) or onto a clip (editor page).
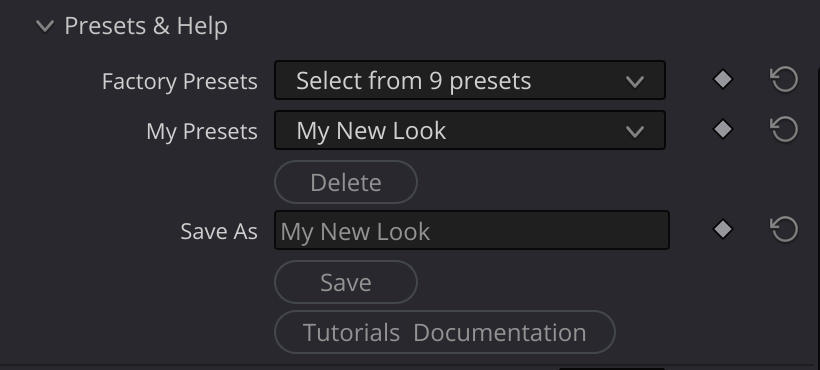
In the presets group, there are two dropdowns: "Factory Presets" and "My Presets". Try out the various factory presets to get the idea of the range of effects you can get with the Advanced Lens Blur OFX.
Later, when you develop your own looks, you can save your own presets; Give your look a name in the "save as" field, and click "save". Then, your own presets will be available in the "My Presets" drop down.
Manual Effect Quick Start:
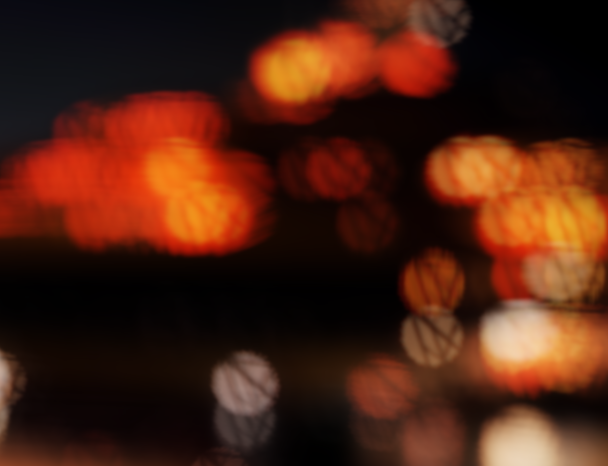
You'll have the most satisfying results if your scene is dark, with bright elements, like lights at night.
- Apply the Advanced Lens Blur effect to your clip, by selecting it from the ofx list - from the "Academy VFX" group. If you're in the color page, drag the effect on to a corrector node. If you're in the edit page, drag the effect onto a clip.
- Set Blur Radius - The most basic parameter is the blur radius, at the top of the parameter list. Start with 20-50 for subtle blur, 50-100 for dramatic bokeh.
- Enable "Swirly Bokeh" to see the swirly effect. Move the swirl factor slider to the left to increase the squeeze of the bokehs. The Swirl Exponent controls how much this effects the center of the image. Lower values make the effect more pronouced at the optical center of the image, higher ones protect the center more.
- Optional: Enable Falloff for a simple radial focus falloff effect. You can slide the "falloff strength" slider to bring the optical center of the image in and out of focus.
- Optional: Try a Rack Focus Change the falloff type to "Depth Gradient", and move the "Rack Focus" slider to select where the in-focus part of the image is. If you turn on "OpenFX Overlays" in the dropdown on the lower left of the viewer, you can change the angle of the in-focus line interactively.
- Optional: Enable Iris Blades for polygonal bokeh shapes.
- Adjust performance - If you have an older/smaller gpu, you might have slow performance. In the "Sampling" group, you can use "Quarter" for preview, "Full" for final render. Don't forget to turn this back to "full" when you're happy with your effect, so it renders at full resolution.
Inputs
| Input | Required | Description |
|---|---|---|
| Source | Yes | The image to blur |
| KernelMap | No | Use the second input's rgb tab to input a custom bokeh kernel, to simulate imperfections in the bokeh. This happens when there's dirt or other imperfections in the optical path of a real camera. Here is a paid collection of kernel textures, and Here is a free collection of kernel textures. You might need to increase your sample rate to use kernel textures. |
| Custom Falloff | No | You can make your own focus maps, and plug them in to the second input's alpha channel. You can use this to define which areas are in focus, to make very specific focus maps. You can do things like "split focus", and more. In the color page, you can use a corrector with a power window to make the map, or use Fusion's paint system - or any other means of generating a soft grad for your focus map. Note - this is NOT a "true 3d" depth map, it's a quick and dirty way to get some - but not all - of that result. |
Parameters Overview
Blur Radius
| Parameter | Default | Range | Description |
|---|---|---|---|
| Blur Radius | 35.0 | 0.0 - 200.0 | Blur amount in pixels (scaled relative to 1080p) |
This is the primary control. The blur radius determines how large bokeh circles appear:
- 0-20: Subtle softening
- 20-50: Noticeable blur, natural-looking
- 50-100: Dramatic bokeh, good for creative looks
- 100+: Extreme blur, very large bokeh circles
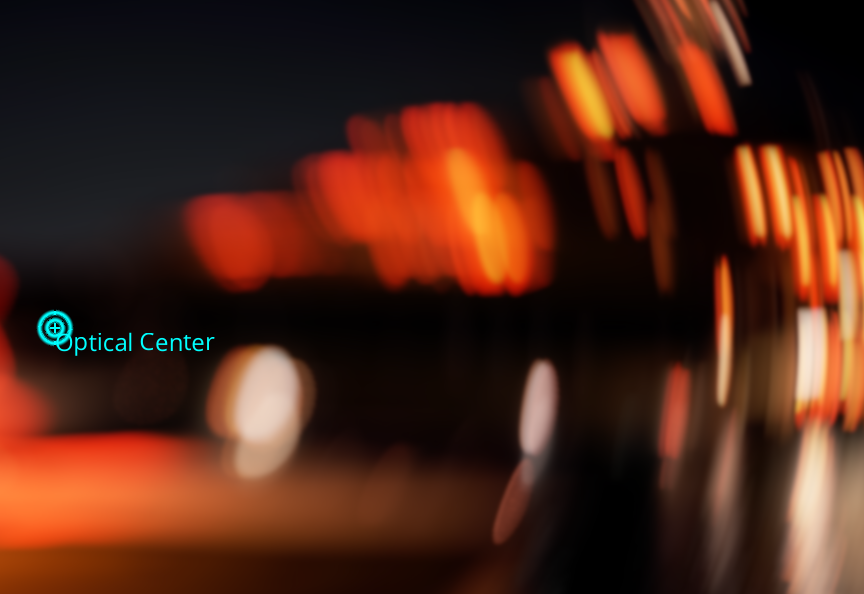
Optical Center
This controls where the center of the lens is. In real lenses, it is usually in or very near the center, and is not really moveable. But with this parameter, you can move it freely, and even animate it!
The optical center interacts with several other parameters: With falloff effects, it defines where the image will be sharpest. With other radial effects, like cat's eye, swirly bokeh and vignetting, it defines where the effect is centered.
Creatively, the optical center, particularly in combination with falloff, let's you guide your audience's attention to where you want it. Radial effects "radiate" from this point on the screen.
To make it easier to work with, select "Open FX Overlays" from the dropdown at the bottom left of the viewer. This enables an on-screen interactive control to move the optical center wherever you want, easily.
Bokeh Pop Group
Make the bright bokeh shapes "pop" more.
One can't really reproduce the high dynamic range of "real life", so when tiny, but very bright spots get blurred, they spread their overpowered energy to a larger area - but since the light is still powerful, these bokeh circles "pop". Use these controls to tune the "look" of the brighter bokeh shapes.
The main one you'll use most is the Strength slider, which controls the extra pop of the bright bokeh circles, in an attempt to simulate a higher dynamic range. As far as the other two sliders, you can usually leave them alone - but feel free to experiment and tune them for your needs.
| Parameter | Type | Default | Range | Description |
|---|---|---|---|---|
| Strength | float | 38.0 | 0.0 - 500.0 | Brightness, emphasis, strength |
| Selectivity | float | 9.0 | 1.0 - 20.0 | Shifts emphasis ranges |
| Blend | float | 2.0 | 0.1 - 10.0 | Base weight for all samples |
Optics Group
Core optical behavior controls that affect bokeh shape and character. This interacts with several other parameters, including Falloff, Swirly Bokeh, Cat's eye and vignetting.
| Parameter | Default | Range | Description |
|---|---|---|---|
| Astigmatism | 0.0 | -3.0 to 3.0 | Creates bright edges on inner/outer bokeh bounds. A very pleasing effect. |
| Anamorphic | 1.0, 1.0 | 0.1 - 5.0 | X/Y stretch of bokeh (2,1 = 2x wider) Anamorphic lenses produce elliptical bokeh shapes. Use this control to simulate that look. |
| Dimple Depth | 0.0 | 0.0 - 1.0 | Dims the center of bokeh circles |
| Dimple Curve | 2.0 | 0.05 - 4.0 | Shape of dimple falloff |
| Edge Width | 0.0 | 0.0 - 1.0 | Width of soft edge zone on bokeh disc |
| Edge Falloff | 2.0 | 0.1 - 4.0 | Curve shape for edge softness |
| Optical Scale | 1.0 | 0.1 - 2.0 | This simulates having a lens that is built for a different size sensor. It changes how radial effects behave. It can give you extreme results, so experiment! |
Astigmatism
Sometimes you'll notice a bright edge on the bokehs of real cameras, that are not symmetrical - they might be all on the "inside" edge (towards the center of frame) or the "outside" edge (toward the frame edges).
Use astigmatism for a subtle and tasteful effect.
Dimple
Many real lenses often have slightly darker centers in their bokeh due to optical aberrations. The Dimple controls simulate this:
- Dimple Depth 0.0 - Uniform bokeh brightness
- Dimple Depth 0.5 - Subtle donut shape
- Dimple Depth 1.0 - Full ring/donut bokeh
Opinion - use sparingly.
Falloff Group
Control how blur varies across the frame to simulate depth of field or tilt shift effects, and to control where blur occurs in the frame.
| Parameter | Default | Range | Description |
|---|---|---|---|
| Enable Falloff | false | - | Enable blur falloff |
| Falloff Type | Radial | Radial, Linear, Custom Depth Map | Pattern of blur distribution. |
| Falloff Strenth | 1.0 | 0.0 - 1.0 | Creates in-focus zone at optical center (1 = sharp at center) |
| Rack Focus | 0.0 | -1.0 - 1.0 | Use this to move the in-focus zone around, like rack focus on a camera. Use with the linear and custom falloff types - it makes less sense with the radial type (but it still works) |
| Falloff Exponent | 2.0 | 0.5 - 4.0 | Makes the in-focus area wider or narrower. Small values makes the in-focus area smaller, and large values makes it wider. |
| Falloff Angle | 0.0 | -180 to 180 | Angle for linear falloff (0=horizontal) |
Falloff Types
- Radial - Blur increases from optical center outward (classic vignette focus)
- Linear - Blur increases from a line in one direction, useful for easy and simple depth of field effects (but not TRUE depth of field, that's harder) or "Tilt Shift" effects (miniature effect).
- Custom - You can generate a monochrome soft map of the focus, for things like split focus effects, where more than one area is in focus. For instance, make a map where there are two soft edged dark bands on a white field, and plug it in to both of the second inputs (color and alpha). You'll see that there are now two areas in focus. You can use the rack focus slider on this, as well.
When you select the Linear falloff type, there is a line where focus is sharp, instead of a point. To make to make this easier to control, select "Open FX Overlays" from the dropdown at the bottom left of the viewer. This enables an on-screen interactive control to move the optical center and the line of good focus wherever you want, easily.
Swirly Bokeh / Petzval Sim Group
Recreate the distinctive swirling background blur of vintage Petzval-style lenses.
Swirly bokeh respects the optical center, and can be used to great effect with it.
| Parameter | Type | Default | Range | Description |
|---|---|---|---|---|
| Enable Swirl | bool | false | - | Enable swirly bokeh effect |
| Swirl Factor | float | 0.25 | -3.0 to 3.0 | Strength and direction of swirl |
| Swirl Exponent | float | 0.7 | 0.5 - 4.0 | Concentration of swirl at edges |
Swirl Factor
Swirl Factor controls the amount that the bokeh is compressed radially. Although the default value is 0.25, 1.0 is the "neutral" value for this parameter; In other words, a swirl factor of 1 has no effect. Values less than 1 compress the bokeh circles radially, values greater than 1 stretch them radially.
Cat's Eye Group
Simulate mechanical vignetting, usually from the hood of the lens, or the barrel, that creates "cat's eye" or "football shaped" bokeh at frame edges.
It's similar to - but distinct from - swirly bokeh.
| Parameter | Type | Default | Range | Description |
|---|---|---|---|---|
| Enable Cat's Eye | bool | false | - | Enable cat's eye simulation |
| Cat's Eye Strength | float | -1.25 | -2.0 to 2.0 | How much occlusion, and in which direction |
| Cat's Eye Falloff | float | 0.25 | 0.05 - 4.0 | How quickly effect increases toward edges |
| Cat's Eye Radius | float | 1.5 | 0.1 - 2.0 | Size of the occluding circle |
| Cat's Eye Softness | float | 0.0 | 0.0 - 5.0 | Edge softness of the occluding circle |
The cat's eye effect is caused by the lens barrel blocking light at wide apertures. Bokeh circles near frame edges become clipped into "lemon" or "football" or cat-eye shapes.
Cat's Eye Strength
This controls how much of the bokeh is occluded. Positive values of bokeh strenth clip the inside edge of the bokeh, and negative values clip the outside edge.
Cat's Eye Radius
When the edge of the bokeh is occluded, this controls the curvature of that occluded edge.
Iris Blades Group
Create polygonal bokeh shapes by simulating aperture blades.
| Parameter | Type | Default | Range | Description |
|---|---|---|---|---|
| Enable Iris Blades | bool | false | - | Enable polygonal bokeh |
| Iris Blades Count | int | 5 | 3 - 12 | Number of aperture blades |
| Aperture Rotation | float | 0.0 | -180 to 180 | Rotation of aperture shape |
| Blade Curvature | float | 0.0 | 0.0 - 1.0 | Curve of blades (0=straight, 1=circular) |
| Blade Softness | float | 0.1 | 0.0 - 1.0 | Edge softness of aperture shape |
You can sort-of "split the difference" between round and polygonal, by adding blade curvature, so you can get a 5 sided aperture that's partly rounded.
Bokeh Occlusion Group
Add animated foreground silhouettes that partially block bokeh, simulating objects in the extreme foreground.
Have you ever noticed in a scene, usually at night, shot with a long lens from far away, zoomed way in on the subject - that the bokehs have a secondary image - as if the camera was located in the grass, or shooting through some waving tree branches - and the bokehs have a moving image of that grass or branches? This is how to get that effect - really easily.
Again, the best way to start is to use one of the presets that have the occlusion effect. They're names include "branches" or "grass".
| Parameter | Type | Default | Range | Description |
|---|---|---|---|---|
| Occlusion Texture | choice | None | None, Grass Sparse, Grass Dense, Branches | Silhouette image |
| Occlusion Opacity | float | 0.5 | 0.0 - 1.0 | How much occlusion affects bokeh |
| Animation Speed | float | 0.5 | 0.0 - 5.0 | Wind animation speed |
| Rotation Range | float | 15.0 | 0.0 - 90.0 | Maximum rotation (sways +/- this amount) |
| Turbulence | float | 0.3 | 0.0 - 3.0 | Motion character (0=smooth, higher=more chaotic) |
| Scale | vec2 | 3.5, 3.5 | 0.1 - 15.0 | Scale of occlusion texture |
| Orientation | float | 0.0 | -180 to 180 | Orientation of the occlusion image |
| Offset | vec2 | 0.0, 0.0 | -2.0 to 2.0 | Position of the occlusion image |
| Pivot Point | vec2 | 0.0, -5.0 | -20 to 20 | Rotation pivot (typically below image) |
Note: Increasing the pivot point (positive or negatively) effectively makes the animation more intense - so you'll probably want to reduce the rotation range as you increase the pivot values.
Cinematic Misalignment Group
Simulate the look of lenses with deliberately decentered elements, occasionally seen in modern cinema for their distinctive rendering.
Cinematic Misalignment bokeh respects the optical center but has it's own optical scale parameter.
Cinematic Misalignment bokeh is also very gpu intensive and finicky, and will almost certainly require higher maximum samples and/or oversampling. Not for the feint of heart.
| Parameter | Type | Default | Range | Description |
|---|---|---|---|---|
| Enable Misalignment | bool | false | - | Enable cinematic misalignment (GPU expensive) |
| Cinematic Misalignment | vec2 | 0.381, 0.75 | 0.001 - 4.0 | Shape distortion parameters |
| M.Optical Falloff | float | 0.708 | 0.01 - 4.0 | Transition speed from circle to target shape |
| M.Optical Scale | float | 0.165 | 0.01 - 2.0 | Distance scale for effect |
| M.Amount | float | 1.0 | 0.0 - 2.0 | Effect intensity multiplier |
Cinematic Misalignment
The basic distortion factor. 1 is unity. Use small numbers for more dramatic effect.
M.Optical Falloff
Like other falloff controls, how much the optical center is distorted.
M.Optical Scale
Like the Optical Scale parameter in the optics section, it represents a mismatch between the lens optics and the sensor size... but with a broken lens, that mismatch is less defined - so you can set it independantly for this one group.
Vignette Group
Optical vignetting darkens the frame edges.
| Parameter | Type | Default | Range | Description |
|---|---|---|---|---|
| Enable Vignette | bool | false | - | Enable radial edge darkening |
| Vignette Strength | float | 0.5 | 0.0 - 1.0 | Amount of darkening at corners |
| Vignette Falloff | float | 2.0 | 0.5 - 4.0 | how much the vignette impinges on the optical center of the image. |
Vignette falloff
Vignette falloff respects both optical center, and optical scale; In other words, the vignette is centered at the optical center, and the size of the vignette is controlled by the optical scale.
Custom Kernel Group
Use an external image to define custom bokeh shapes.
Sometimes, there are imperfections or schmutz on or in the lens, and it interferes in the optical path, making the bokeh shapes show that schmutz. You can use this effect to simulate that.
Or, you can use it for "creative effects" by hand painting a kernel, or even using a picture for a kernel.
You can also get interesting chromatic abberation effects with colored kernels too.
You use it by piping your kernel image into the second input of the ofx, and enabling Custom Kernel.
It's probably best to use a square image. Only the central circle of the image will be used.
| Parameter | Type | Default | Range | Description |
|---|---|---|---|---|
| Enable Custom Kernel | bool | false | - | Use KernelMap input for bokeh shape |
| Kernel Rotation | float | 0.0 | -180 to 180 | Rotation of kernel image |
Connect a grayscale image to the KernelMap input. White areas define where light passes through; black areas block light.
Sampling Group
Quality and technical controls.
At Large Blur radii, or extreme bokeh distortions, you'll likely need to increase sampling.
| Parameter | Type | Default | Range | Description |
|---|---|---|---|---|
| Quality | choice | Full | Quarter, Third, Half, Full | Sample count multiplier |
| Min Samples | int | 128 | 8 - 512 | Minimum samples for small radii |
| Max Samples | int | 512 | 16 - 1024 | Maximum samples for large radii |
| Oversample Factor | float | 1.0 | 0.5 - 4.0 | Quality multiplier |
| Sample Divisor | float | 3.5 | 1.0 - 20.0 | Lower numbers yeild higher quality, at the expense of performance. |
| Post Blur Scale | float | 0.15 | 0.0 - 0.5 | You can very often get great results at lower sample rates by increasing this. |
| Reflect Edges | bool | false | - | Mirror instead of stretch at edges |
| Input Colorspace | choice | Linear | Linear, Rec.709 | Linearize input for accurate bokeh... but in practice, select whichever setting looks best for the context. |
Post Blur Scale
If you find that you're seeing sampling artifacts on your larger bokeh circles, this is the first thing you should try. Compared to oversampling, it costs much less (computationally) and is very often the best way to get good results.
Quality
This ofx is performance hungry. If your system bogs down with your bokeh settings, you can use this control to go into "draft mode" by lowering the sample rate to half, third or quarter. Don't forget to turn it back to "Full" for final rendering.
Min and Max Samples
As the sample rate is dynamic, this is the smallest and largest samples that will be taken per pixel. This is usually enough for "normal" ranges, but we all like to push things, so you might have to adjust these, or use the other controls, as described here below.
Oversample Factor
This multiplies the min and max samples - be careful! It will make your machine's fans howl if you go too far!
Sample Divisor
This alters the sample rate calculations in a different way - lowering this number increases the sample rate.
Tips & Tricks
Natural Focus Falloff
- Enable Falloff with Radial type
- Set Falloff Rack to 1 so the center is sharp.
- Adjust Blur Radius and falloff exponent to taste.
- Add subtle Vignette (0.2-0.3)
Rack Focus
Note: This is not a "true 3d depth aware" rack focus, but it's still looks great, and is very useful and fast.
- Enable Falloff with Depth Gradient (linear) type
- Set Falloff Strength to 1 so the center is sharp.
- Adjust Blur Radius and falloff exponent to taste.
- Move the Rack Focus slider to move the focus point back and forth.
- Adjust the angle of the sharp area with the Falloff Angle
Vintage Petzval Look
(You can just use the preset, but here's how you can do it manually)
- Enable Swirl with factor 0.25
- Enable Falloff with Falloff Rack of 1, and falloff exponent at 1.3 to 2.0
- Enable Vignette with strength at 0.2, and exponent at 3 for a slight vignette.
- To keep your subject sharp, turn the OFX Overlays on and move the optical center to your subject.
Anamorphic Cinema Look
- Set Anamorphic to (2.0, 1.0) for horizontal stretch
- Adjust Bokeh Pop-> Strength for dramatic highlights
Performance Optimization
- Use Quarter quality for preview, Full for render
- Reduce Max Samples if blur radius is moderate
- Post Blur Scale can smooth artifacts without high sample counts
Troubleshooting
Visible sampling artifacts
- Increase Max Samples
- Try increasing Sampling>Post Blur Scale as your first action. If that's not satisfactory, try slowly increasing Max Samples, or sample scale. Be careful when increasing samples, it will tax your gpu.
Bokeh circles "look flat" (color wise)
- in the Bokeh Character group, double click all of the parameter names to reset them.
- Increase Bokeh Contrast and/or
- Decreast Bokeh Smoothness
- Check Input Colorspace (use Rec.709 if source is gamma-encoded)
Edge artifacts
- In the Sampling Group: Enable Reflect Edges